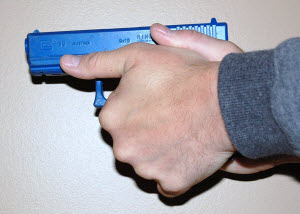
 Understanding, developing and refining an effective and consistent combat or final firing grip on the pistol are essential to repeatedly engage a designated target with both fundamental (precision) and combative (getting the hits necessary to stop the threat) marksmanship. While a less than optimal grip will allow us to hit a target once, follow-up shots are unlikely to hit where we want without a consistent combat handgun grip. Having worked with a lot of shooters over the last 10+ years, I have found that handgun grip and improper trigger management are the two main reasons why people cannot or do not consistently put rounds where they desire.
The final firing grip (FFG) is our physical interface with the firearm. A proper FFG should provide the shooter with:
Natural point of aim or consistent indexing of the handgun in our visual cone, so our sights are already aligned without having to do any work to align them.
Effective management of both vertical recoil (muzzle flip) and horizontal recoil upon discharge. Grip Guidelines
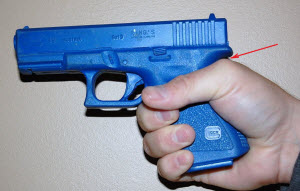
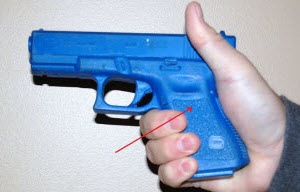
To achieve these goals, a few guidelines need to be followed whenever gripping the handgun. First, the strong hand needs to grip high into the beavertail or backstrap of the pistol, to the point where the flesh in the web of your hand is compressed. The higher the handgun grip into the backstrap, the closer the hand and forearm are aligned with the bore axis, thus providing better management of vertical recoil or muzzle flip.
Second, the middle finger of the strong hand should ride high and tight against the “root” of the trigger guard, or where the trigger guard grows out of the handgun grip itself on the frontstrap. This limits downward movement of the gun if the trigger is slapped or managed improperly.
Last, the support hand must meld with the pistol and envelop as much of the gun as possible, thus providing maximum friction on the gun and limiting lateral recoil or muzzle sway.
Both hands should grip the handgun firmly and an attempt should be made to exert forward and rearward pressure similar to clamping or squeezing a pair of pliers with the strong hand and side to side pressure with the support hand. In some training circles, a numeric designation for the amount of pressure to exert is given, such as 40% pressure with the strong hand and 60% with the support hand, although I doubt that under pressure of attack anyone will be cognizant of such references. Simply remember to grip high, grip firmly and cover as much of the frame of the handgun with flesh as physically possible.

Common Handgun Gripping Methods
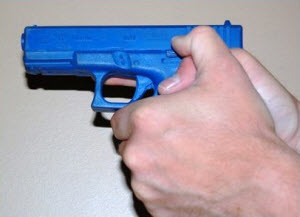
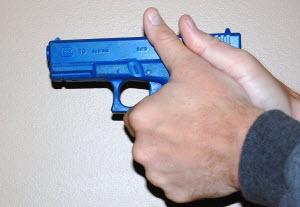
Revolver handgun Grip utilized with guns with no beavertail is easily taught but less than optimal for today’s combative environment.
Revolver Grip
The revolver handgun grip is commonly seen in law enforcement and among citizen shooters. This grip is easy to teach to new shooters or large groups at one time and works well with almost any modern semi-auto handgun or revolver. At statistically common gunfight distances (0 to 7 feet), shooters can quickly attain combat-effective hits. Executed properly with a revolver, this grip exerts downward pressure with the thumbs in an attempt to minimize vertical recoil. When utilized with a semi-auto pistol, this grip keeps the support-side thumb from contacting the slide or frame.
One benefit of this handgun grip is that it allows the support-side thumb to be used to engage/disengage the safety or de-cocker on larger pistols for individuals with small hands. However, one of its weaknesses is how this grip can create a pocket or gap between the support hand and the frame. The gun can recoil into this gap, especially when firing rapid shots or follow-up shots at greater distances. In addition, the forward end and frame of the pistol are left exposed, creating an opportunity for excessive lateral recoil. While proponents of the Revolver Grip advocate how easy it is to teach and to learn, it has been my experience that both new and experienced shooters acclimate to other grip methods just as well without experiencing the associated weaknesses.
Thumbs Up Grip
I have seen some students of the modern technique schools utilize the Thumbs Up Handgun Grip. Elevation of the strong-hand thumb often forces the web of the strong hand higher into the backstrap of the pistol, providing better vertical recoil management. Elevation of the support-hand thumb provides greater coverage of the support hand on the grip frame of the pistol, increasing grip friction. Advocates of this gripping method state that with the Thumbs Up Grip, there is less chance of inadvertently hitting the slide stop/release or de-cocker as compared to the Leatham-Enos Thumbs Forward Grip (see below).
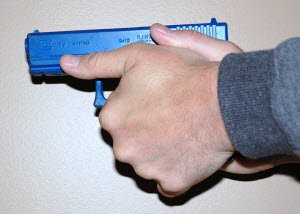
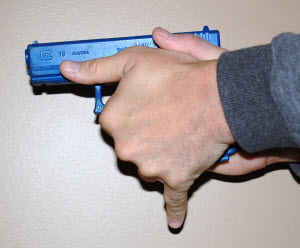
Leatham-Enos Grip: thumbs forward, equal pressure with both hands and support wrist locked, pointing support thumb toward target.
Leatham-Enos Grip
The Leatham-Enos Grip was developed in the early 1980s by competitive shooters Rob Leatham and Brian Enos. In this handgun grip, the pistol is completely enveloped by the hands. The strong-side hand rides high and tight into the backstrap, and the inside of the support-side thumb fills the gap on the frame of the pistol. The support-side wrist and thumb are pointed straight alongside the bore toward the target. Some shooters lock the wrist forward and lock the support-side elbow while bending the strong-side elbow (reverse Weaver), as this provides a consistent physical index. With the support-side thumb and wrist forward, the pinky of the support hand should point straight toward the ground (or as close as physically possible) when flagged as a test of this grip.
- – Four specific “index” or reference points for establishing this grip are helpful:
- – Strong hand high in the backstrap.
- – Strong hand middle finger high and tight to the root of the trigger guard.
- – Meat of inside of support-hand thumb filling the gap on the frame of the pistol grip.
- – Inside of the first knuckle on the support-side thumb gently touching the forward frame of the lower receiver just above the front of the trigger guard (not on the slide).
- – Some shooters run into problems such as riding the slide stop/release with the strong-side thumb or pushing up on the slide stop with the support-side hand. With a little practice, this soon becomes a non-issue. Remember the strong-side thumb runs a little higher or straight up like in the Thumbs Up Handgun Grip, and the support hand only runs alongside the frame of the pistol. The support-side fingers exert side-to-side pressure.
Which Handgun Grip?
Some readers will recognize one or all of these handgun grips and may already be using one of them. (I hope you’re using only one.) Finding the right handgun grip for you involves shooting a little with a friend and testing yourself at various ranges and speeds or shot cadences. If you can fire five rounds as fast as possible from five yards and keep all the rounds within four inches or the size of a balled fist, then you’re on the right track. If not, then you may need some coaching to better determine which handgun grip is right for you in order to achieve maximum efficiency and consistency.
A Common Mistake
A common mistake is the shooter not gripping high enough into the backstrap of the handgun. This leaves a small gap which the gun can then vertically recoil into when discharged. To fix this, remember to grip high and tight into the backstrap and flag the strong-side thumb upward. This also provides a good visual of the space on the grip frame of the handgun which needs to be filled with the support-side hand.
Handgun Grip Modifications
The better the handgun grip, the less the gun moves and the more quickly it returns on target after discharge. Grip tape/stair tape/skateboard tape/whatever you want to call it has been used for years to help increase the friction and traction hands get on the gun. Some shooters prefer some type of handgun grip decal or rubber sleeve but, having tried most of the commercially available products, I have not found any that stay solidly on the gun long-term and don’t change the handgun grip to the point that it feels uncomfortable. Everyone’s hands are different, so this may not be the case for you.
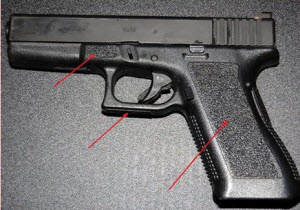
Grip tape on key areas such as sides of grip frame, underside of trigger guard, and forward support-side thumb index point on lower receiver.
Another option is having the handgun grip professionally “stippled” or textured. This modification may or may not affect the resale value of your handgun but, if you’re like me, you care more about how well you shoot than you do about what might happen if you decide to sell it. I did my own stippling job on my G19 with a Sears Craftsman soldering iron.
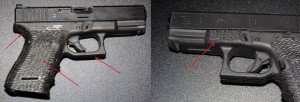
Stippling on key gripping surfaces such as sides of grip frame itself, backstrap, frontstrap, root of trigger guard, and support-side thumb rest/index point on forward frame.
Maximizing Performance
Shooting is a complex combination of multiple skills that some individuals pick up rapidly, while others require time and patience to achieve the goals they set for themselves. If shooting fast and accurately every time were easy, everyone would be a top-ranked competitive shooter and nobody would miss an enemy combatant or attacker during a self-protection related encounter. No matter the skill level, understanding, refining and possibly improving upon the combat handgun grip will aid in becoming a better precision shooter and/or faster and more accurate combative shooter.

Premium Membership
Unlock exclusive member content from our industry experts.
- 24/7 Access to Premium Personal Defense and Firearm Training Videos and Drills
- Step-by-Step Instructional Demos and Guides
- 50% Off Video Downloads Purchased in the Personal Defense Network Shop
- Access to Ask the Expert Program
Unlock exclusive member content from our industry experts.
- 24/7 Access to Premium Personal Defense and Firearm Training Videos and Drills
- Step-by-Step Instructional Demos and Guides
- 2 Full-Length Video Downloads to Watch Offline
- 50% Off Video Downloads Purchased in the Personal Defense Network Shop
- Access to Ask the Expert Program
Gold Membership
$340 Value
Get everything included in Premium plus exclusive Gold Membership benefits.
- 24/7 Access to Premium Personal Defense and Firearm Training Videos and Drills
- Step-by-Step Instructional Demos and Guides
- 9 Full-Length Video Downloads to Watch Offline
- 2 Full-Length Personal Defense Classes to Keep for Life
- 2 In-Depth Skill Development Presentations
- Discounts on Purchase-to-Own Content in the Personal Defense Network Shop
- Access to Ask the Expert Program
- Exclusive GOLD LIVE Streaming Events
Why viewers still make use of to read news papers when in this technological world everything is available on web?
It's time you start editing the comments to eliminate those that are advertising services and merchandise that have nothing to do with the article.
Pretty section of content. I just stumbled upon your weblog and in accession capital to assert that I get in fact enjoyed account your blog posts. Anyway I'll be subscribing to your feeds and even I achievement you access consistently quickly.
Nice post. I learn some thing much more difficult on different blogs everyday. It is going to consistently be stimulating to read content from other writers and practice just a little something from their store. I'd prefer to use some using the content on my weblog whether you don't mind. Natually I'll give you a link on your web blog. Thanks for sharing.
what is here called The Leatham-Enos Grip was actually developed at Gunsight. the grip was used by 99% of the shooters during the 80's. it's really nice when Leatham-Enos try to reinvent history and take credit for something they didn't invent
That area acts as another point of contact, specifically with the index finger of the support side hand. Any friction between the hands and the pistol will be the first interference that the recoil effects encounter.
Why do you stipple or grip tape the bottom of the trigger guard?